INSTALLATION & BACKTESTING RITUAL
Unleash KRATOS AI in MetaTrader 5
Follow these steps to install, train, and test the Kratos AI Expert Advisor on your MT5 platform. Ensure you have the Kratos AI folder ready. Click on any image to enlarge.
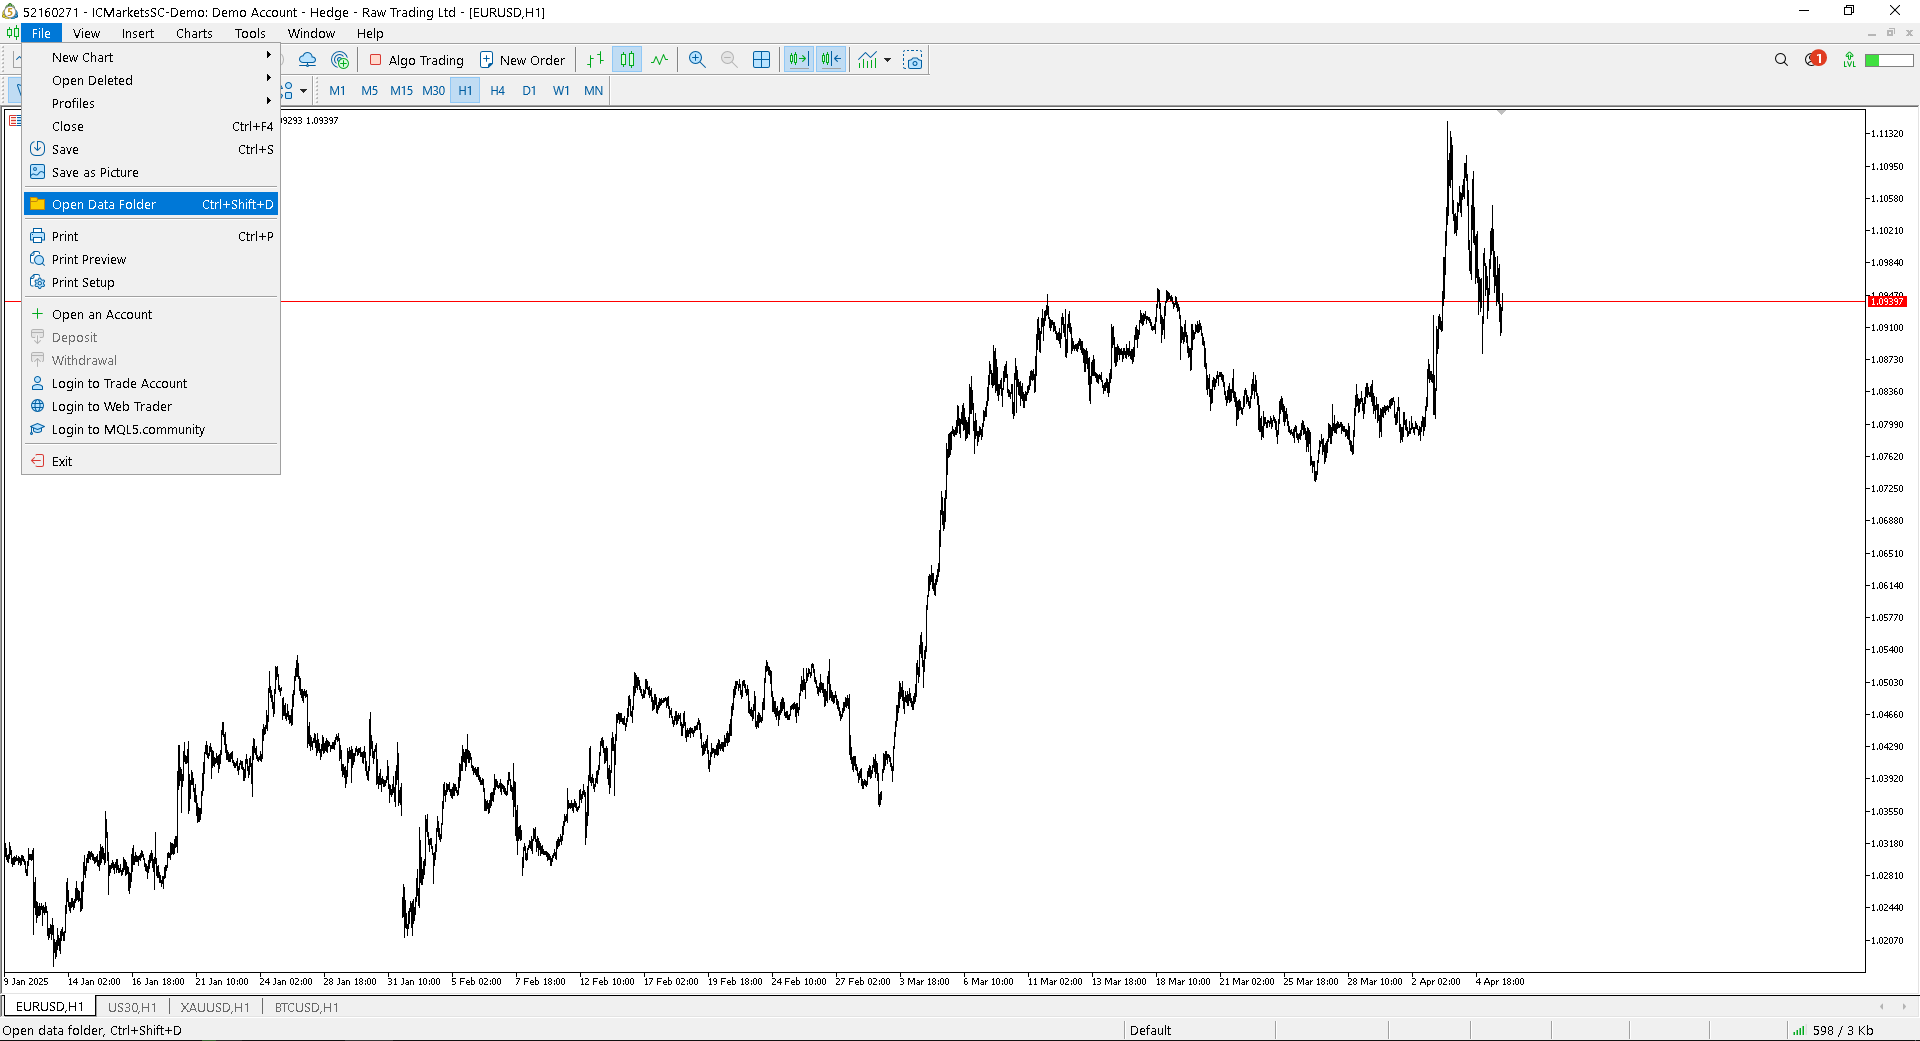
STEP 1: Place the Kratos AI Folder
In MetaTrader 5, go to the top menu and click on: File > Open Data Folder.
Navigate to the MQL5 folder, then into the Experts folder.
Paste the entire folder Kratos AI (Demo) (or the full version folder) directly into this Experts folder.
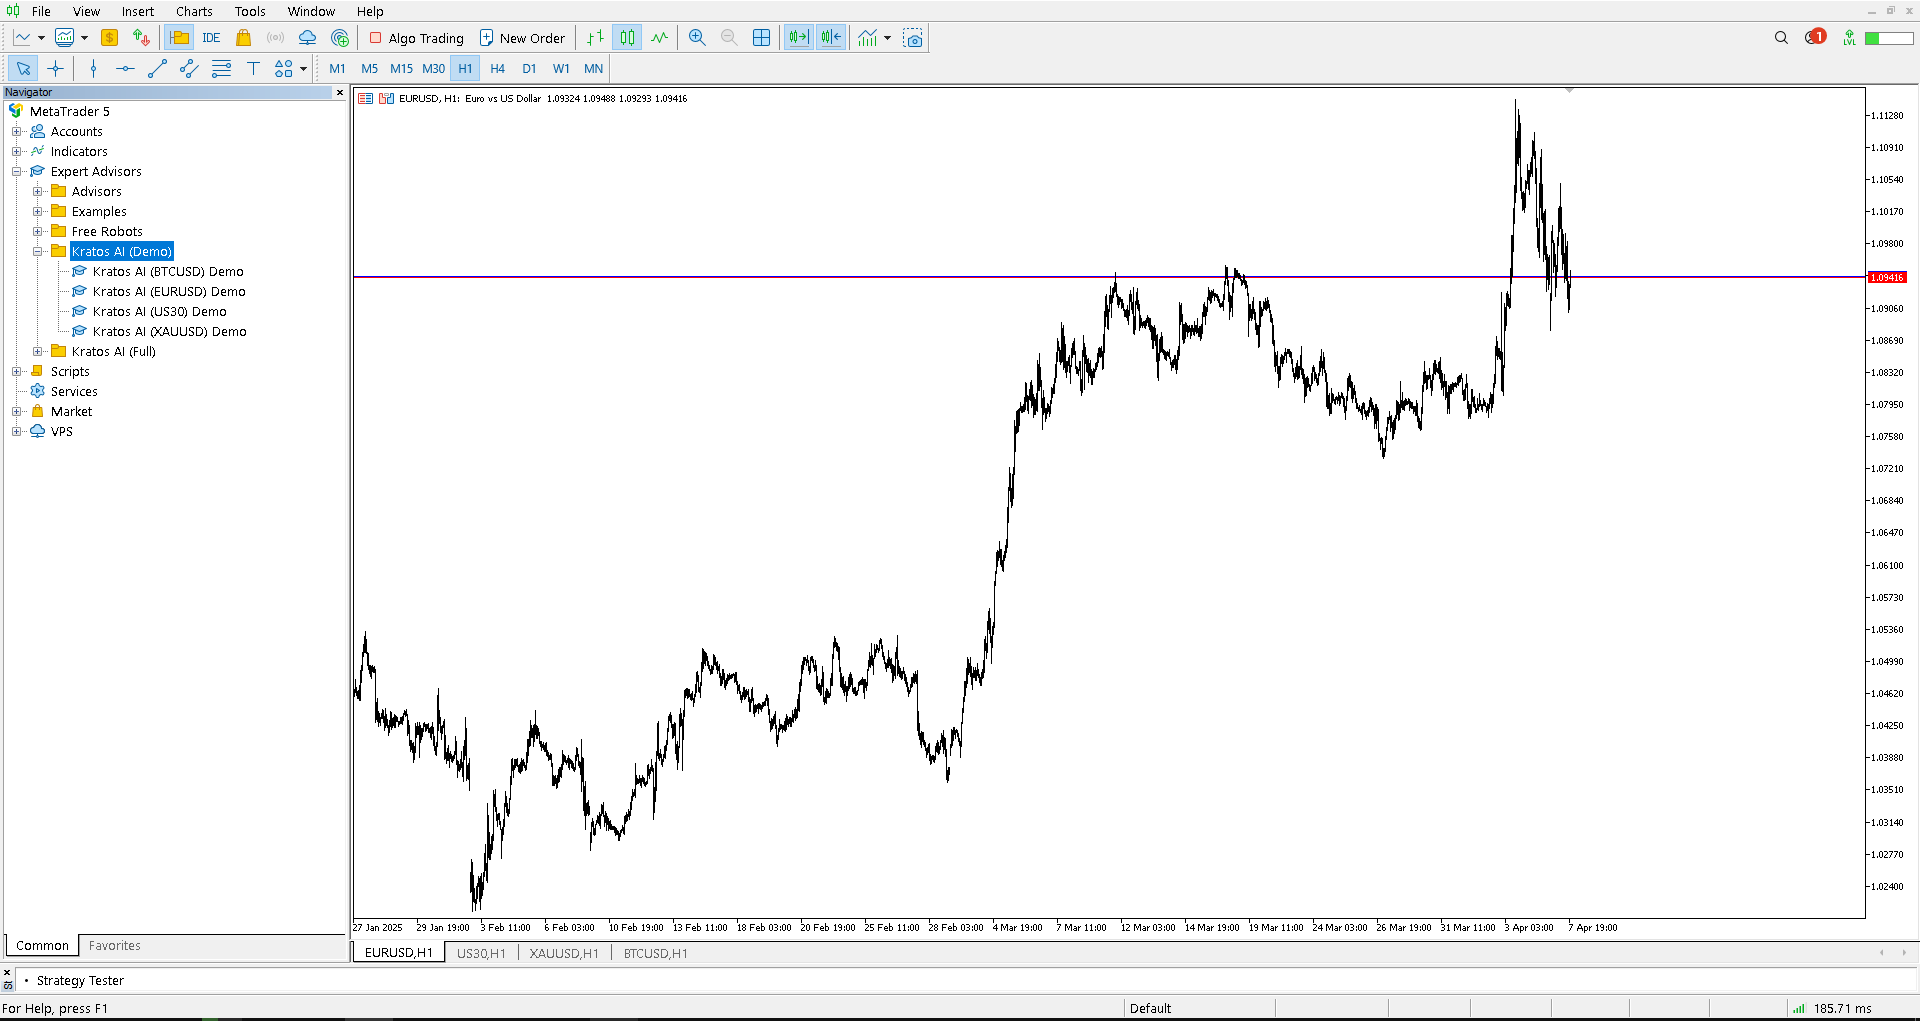
STEP 2: Refresh Experts & Open Strategy Tester
Go back to MetaTrader 5. Look for the "Navigator" panel (if it’s not visible, go to View > Navigator or press Ctrl+N).
Inside the Navigator, right-click on Expert Advisors and select Refresh. The Kratos AI folder and its EAs should now appear in the list.
Open the Strategy Tester by going to View > Strategy Tester or pressing Ctrl+R.
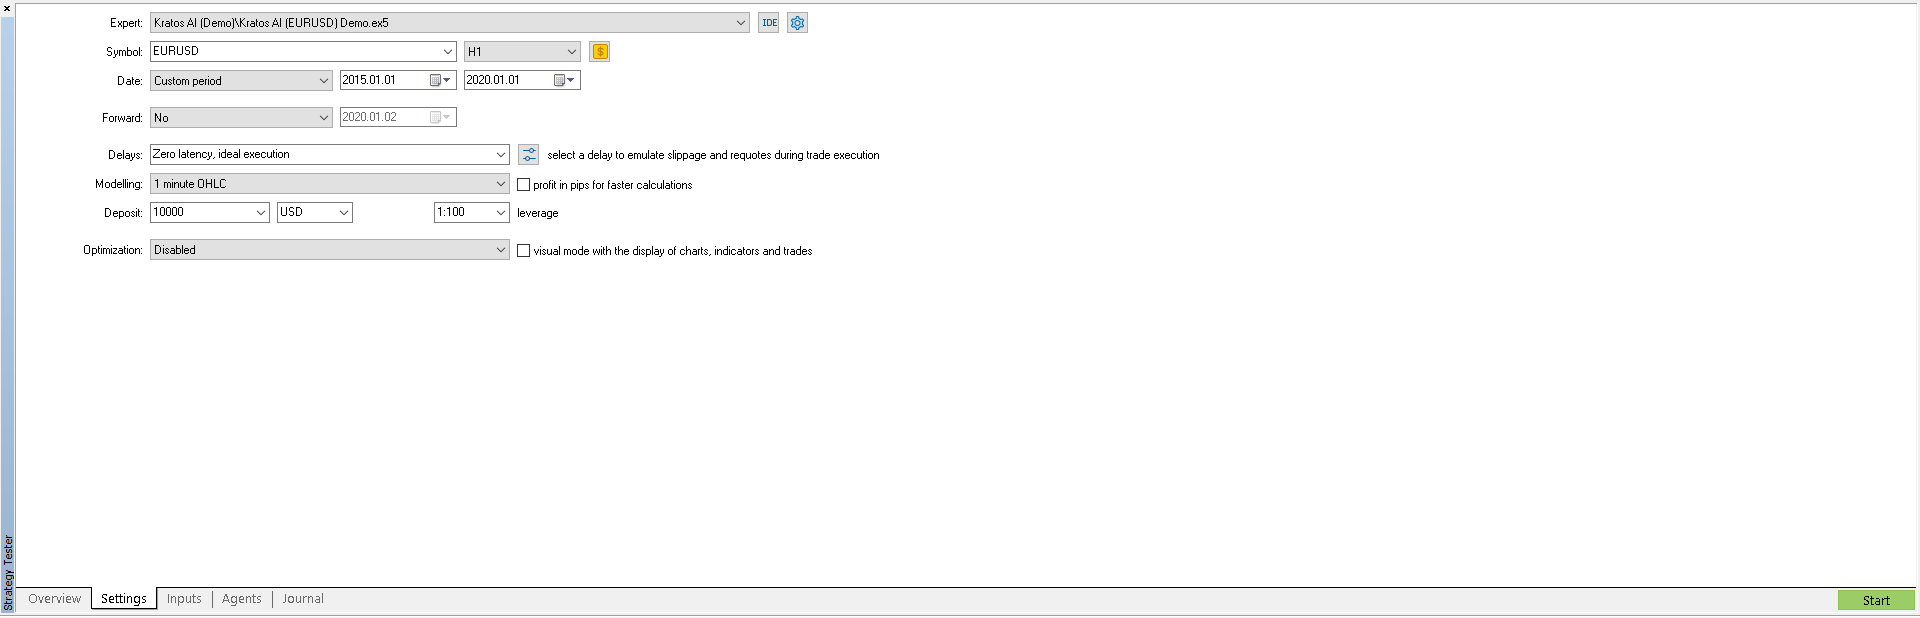
STEP 3: Configure Initial Backtest Settings
In the Strategy Tester window, go to the Settings tab.
Select one of the Kratos AI robots as the Expert Advisor from the dropdown menu (e.g., Experts\Kratos AI (Demo)\Kratos AI (EURUSD) Demo).
Important: Remember to use each robot with its corresponding pair (e.g., use the bot "Kratos AI (EURUSD) Demo" with the EURUSD symbol). If you try to use a bot with a pair that doesn’t match its name, the backtest won’t start.
Enter the rest of the data as shown in the image (Symbol, Timeframe H1, Date range for initial backtest, Modeling method 'Every tick' or 'OHLC M1', Initial Deposit, etc.).
Recommended Start Dates:
- For
EURUSD, a minimum start date of2000.01.01is recommended. - For
XAUUSD, it’s recommended to start from at least2005.01.01. - For
BTCUSD, use a minimum start date of2018.01.01. - For
US30, a recommended minimum start date is2018.01.01.
Note: These start dates are recommended because data prior to them may be of lower quality or unavailable for some brokers. (For this test, we will start from 2015, for demonstration purposes only.)
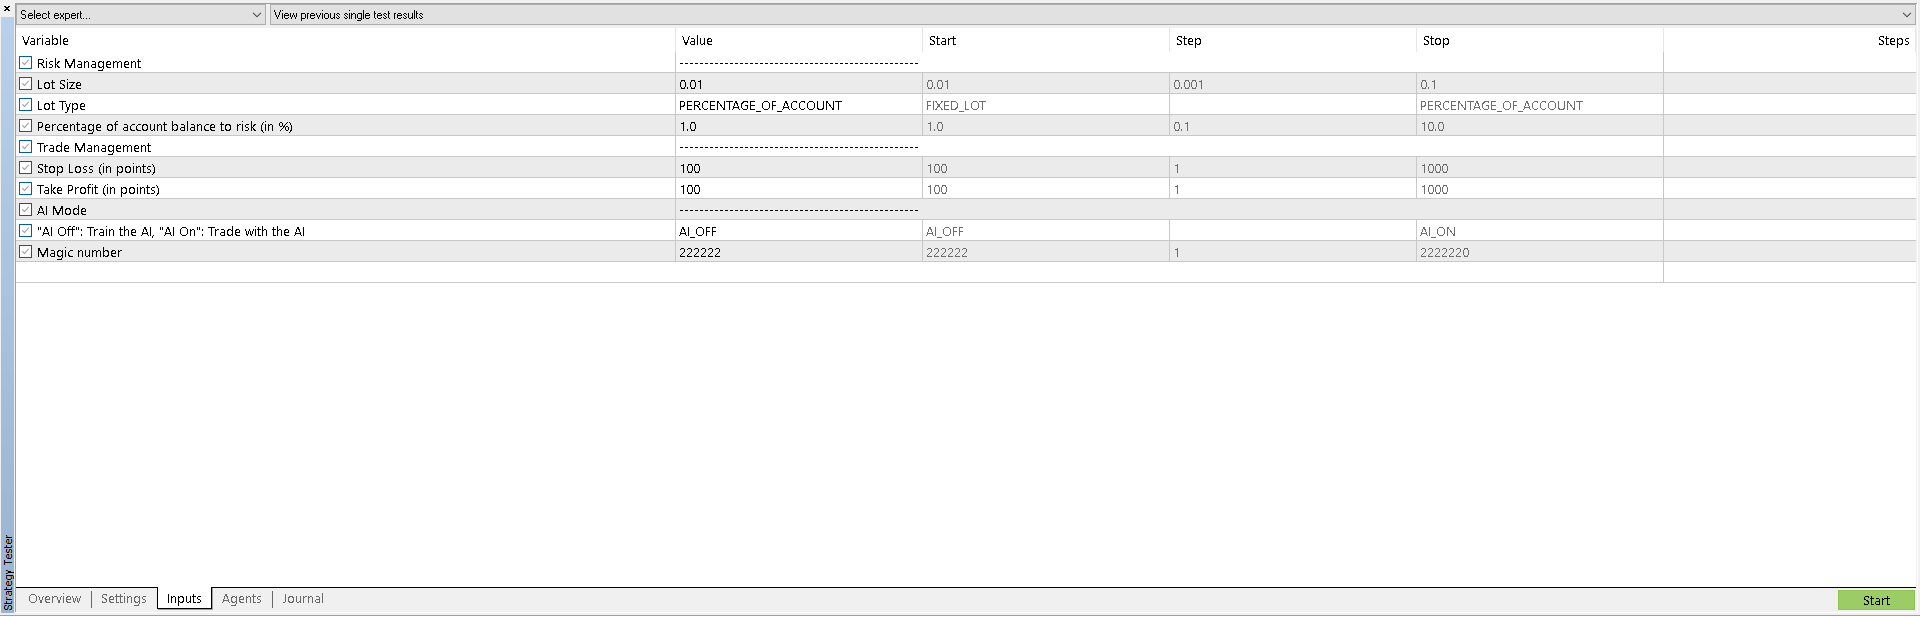
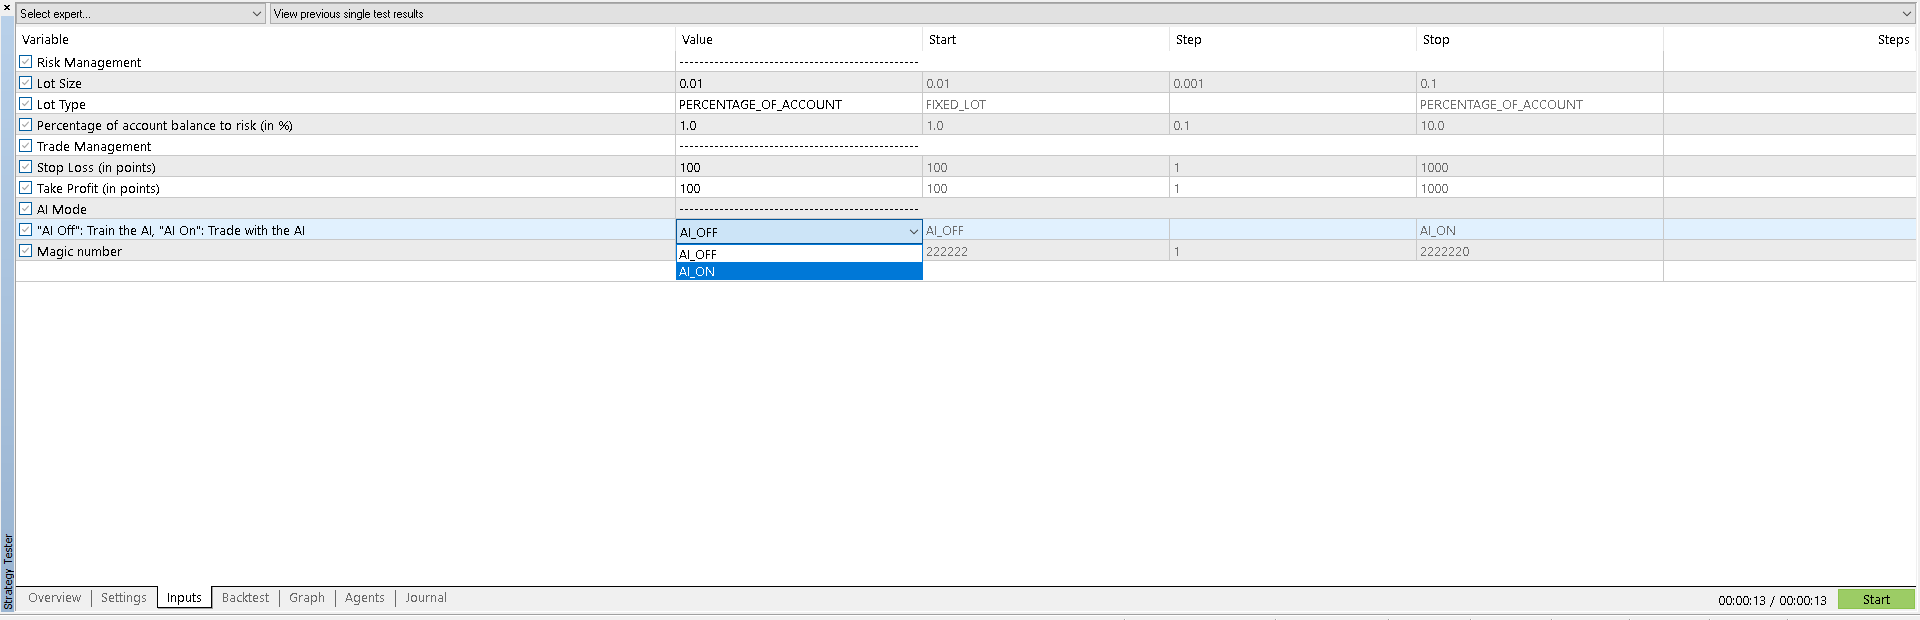
STEP 4: Set Inputs for AI Training
Go to the Inputs tab within the Strategy Tester.
Set the parameters as shown in the image provided for this step.
Crucial: Make sure the AI Mode parameter is set to AI_OFF - Train the AI. This is key for the AI to learn from the historical data.
Click the Start button at the bottom right to begin the training backtest.
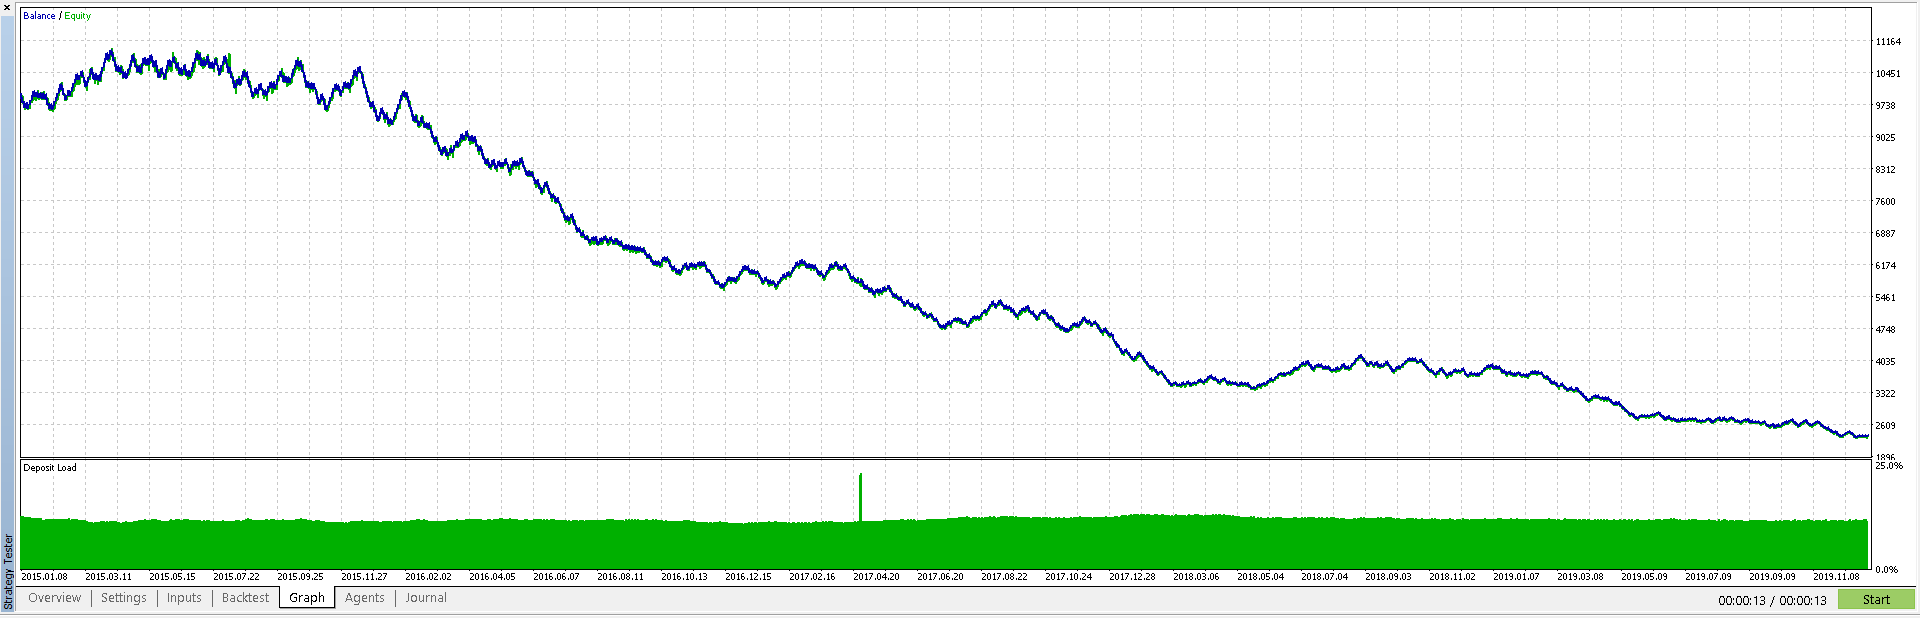
STEP 5: Review Initial Training Graph
Once the backtest is complete, go to the Graph tab.
You should see a result similar to the image provided for this step. This shows the performance of the robot's base logic *without* the AI actively trading, but this run was necessary for the AI to gather training data.
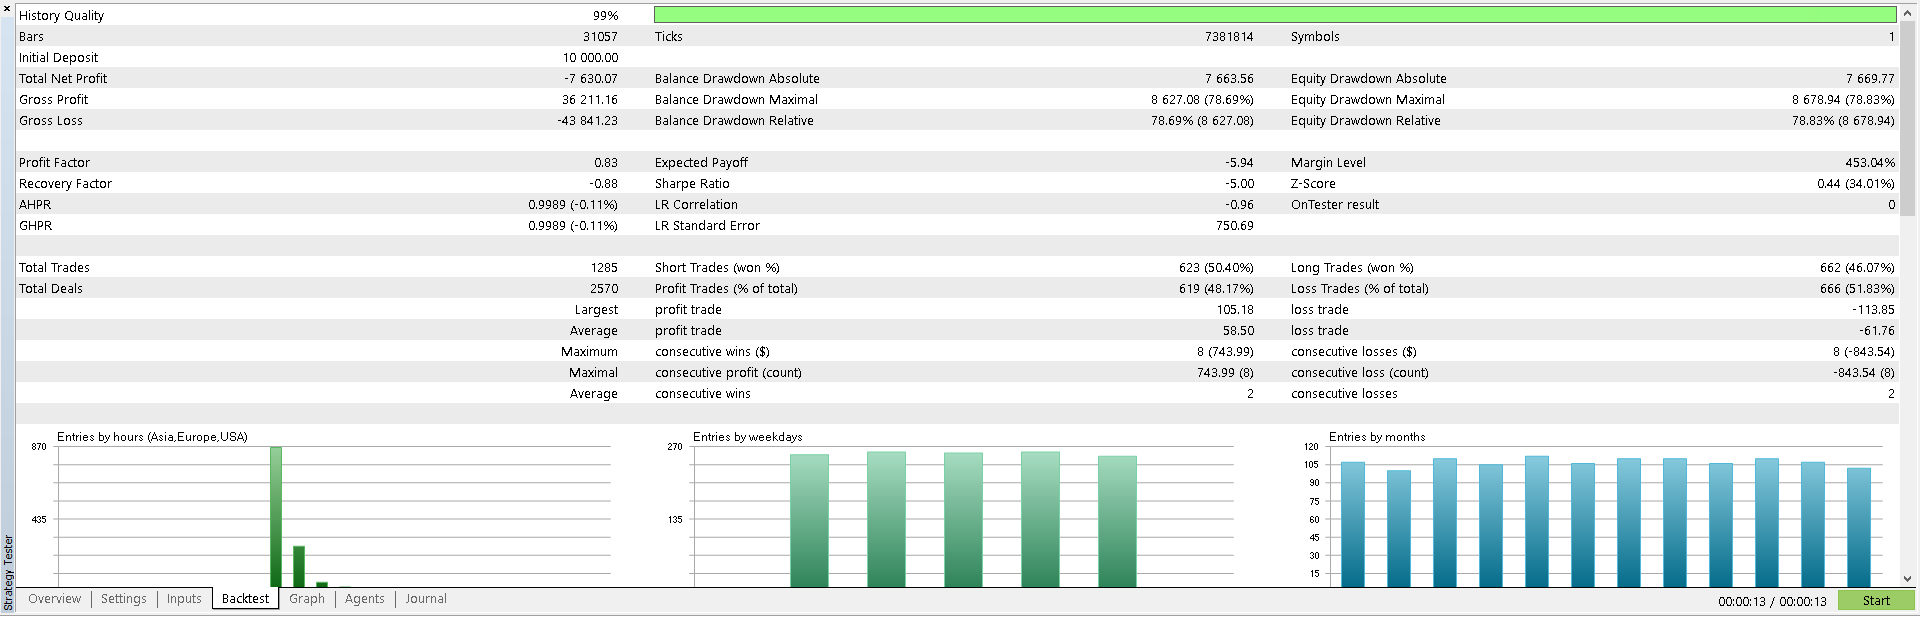
STEP 6: Review Initial Training Statistics
Go to the Backtest tab to view the detailed trading statistics from the initial training run (when AI Mode was OFF).
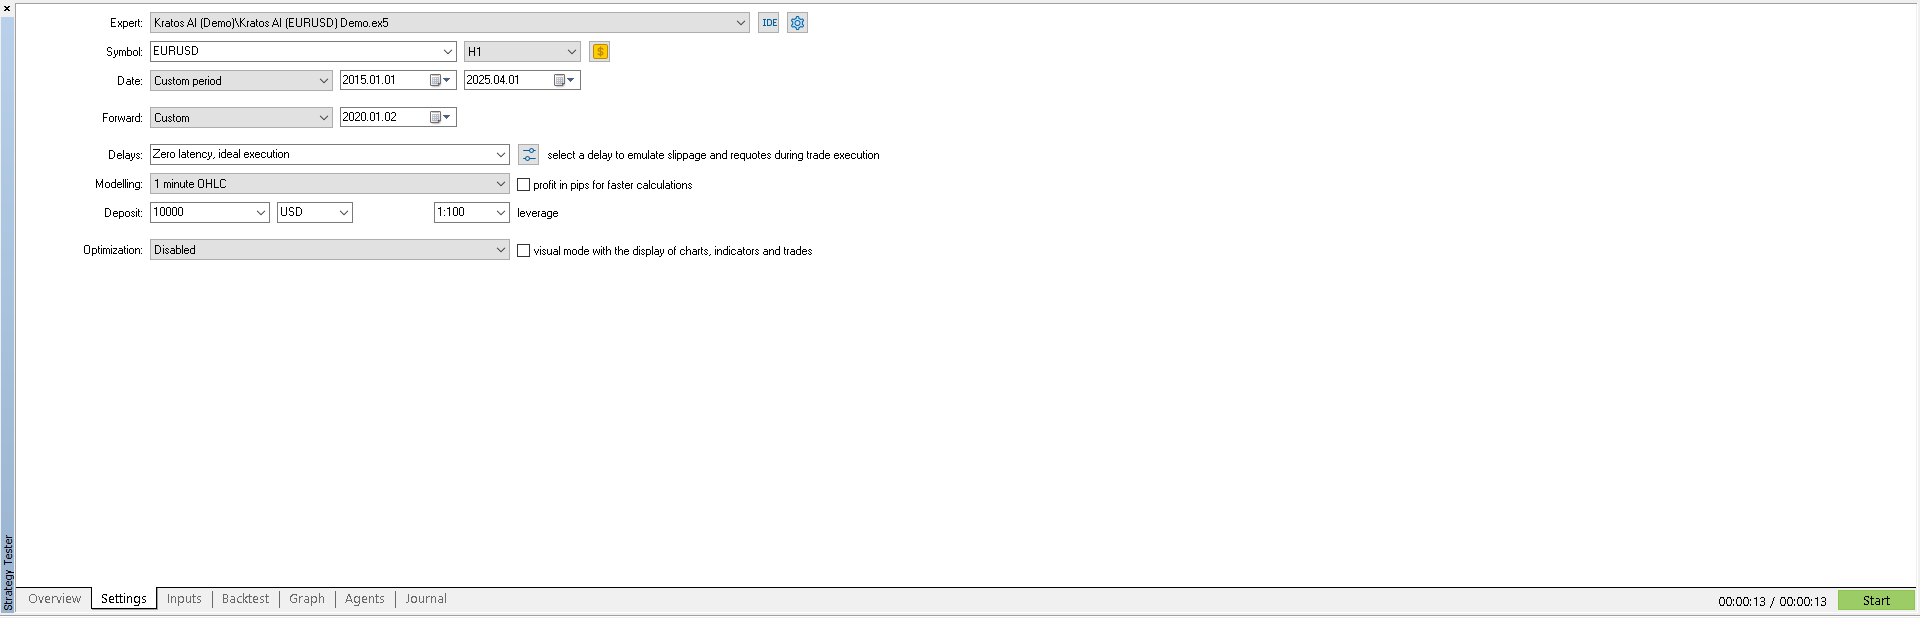
STEP 7: Configure Forward Test Settings
Return to the Settings tab.
Modify the data as shown in the image for this step:
- Increase the end date of the test period (the 'To' date) to include more recent data.
- Enable the
Forwardoption by selecting "One third", "One quarter", or a "Custom" period from the dropdown. This reserves a portion of the data (e.g., the last 1/3 or 1/4) for testing the EA with data it wasn't explicitly trained on in the first run. (For this test, we will start the Forward Period from 2020, for demonstration purposes only.)
STEP 8: Set Inputs for AI Active Trading
Go back to the Inputs tab.
Now, change the AI Mode parameter to AI_ON. This instructs the robot to use the trained artificial intelligence for its trading decisions during the test.
You can adjust other parameters like Percentage of account balance to risk, Stop Loss (in points), and Take Profit (in points) if desired, but by default, these parameters are already optimized for each robot, so it’s recommended not to modify them too much.
Click the Start button again to run the combined test (Backtest on the initial period + Forward test on the newer period, now with AI_ON).
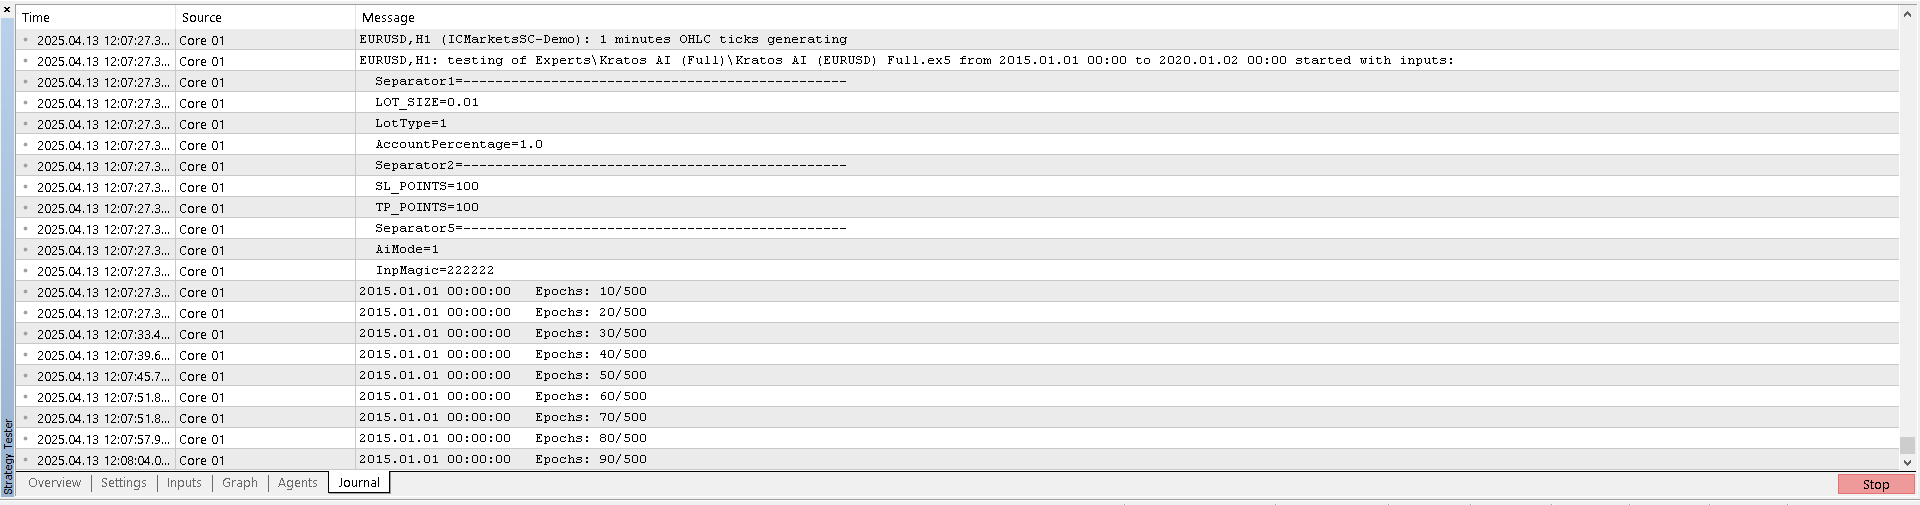
STEP 9: Monitor AI Training Process
Go to the Journal tab to view the AI training process.
Wait until the training is complete (this takes approximately 7 to 10 minutes for both the normal and forward periods). Once the training is finished, the Graph and Backtest tabs will open, allowing you to view the results.
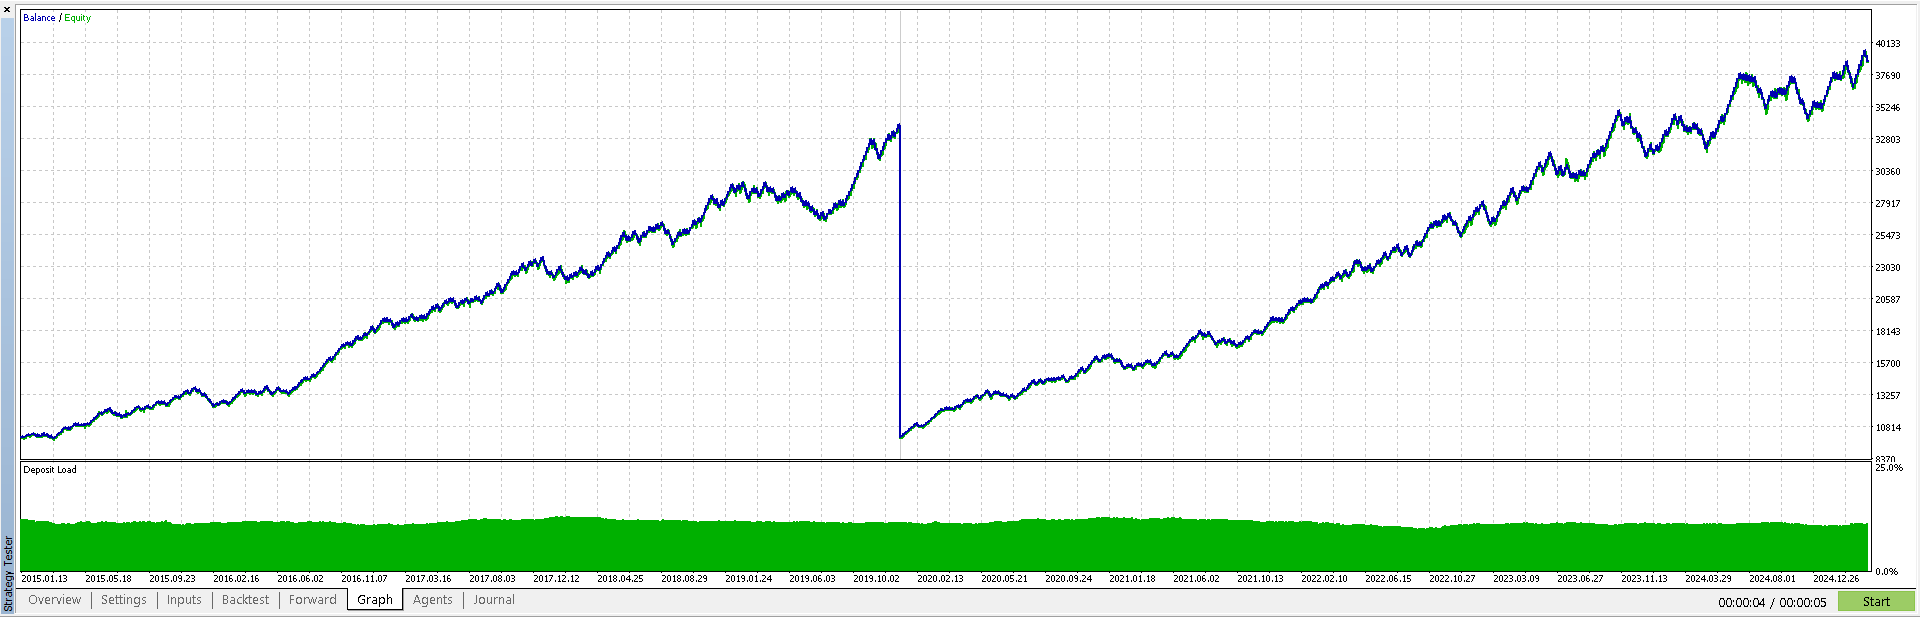
STEP 10: Review Combined Test Graph
After the test completes, go to the Graph tab.
You should see a result similar to the image provided. You'll typically see the graph divided into two sections: the initial training period (Backtest) followed by the Forward testing period on new data.
Note: The vertical line or sharp change often seen separating the Backtest and Forward periods marks the transition and reset of statistics for the Forward section. It does not indicate a drop in the account balance to that visual level.
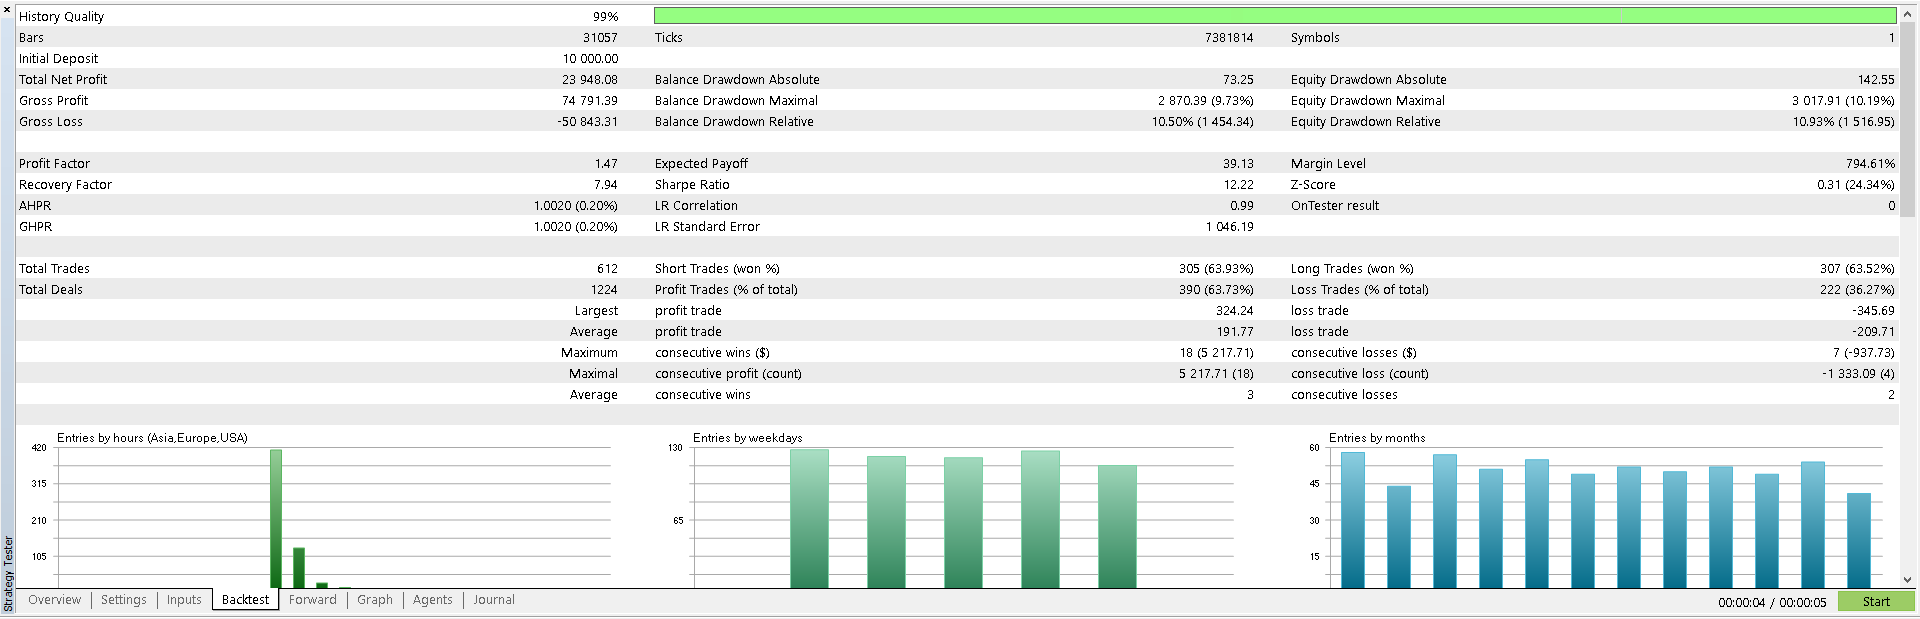
STEP 11: Review Backtest Statistics (AI_ON Run)
You can go to the Backtest tab again. The statistics shown here now correspond to the performance during the initial training period portion of the *last run* (where AI Mode was ON).
STEP 12: Review Forward Test Statistics
Go to the Forward tab. This tab shows the robot's performance statistics specifically during the Forward testing period (the period with new data, outside of the initial training window).
This Forward result gives a better simulation of how the EA might perform on unseen market data.

Oracle's Advice
- Broker Quality: We highly recommend using a broker that provides high-quality historical data to ensure more accurate backtesting results. (MetaQuotes Demo Accounts have the best quality right now).
- Parameter Tuning: While defaults are optimized, experiment cautiously with input parameters on demo accounts or further backtests to understand their impact. Refer to any specific guides provided with your Kratos AI version.
- Broker Differences: Backtest results can vary slightly between brokers due to differences in historical data quality, spread, and slippage simulation.
- Support: If you encounter insurmountable difficulties, do not hesitate to contact support through the channels provided on the main Kratos AI page.